Since March 2006, I have attended six formal photography workshops. In addition, I have attended numberous single-day workshops and portfolio reviews. This week, I will tell you what I look for in a photography workshop and the extent to which each of my experiences fulfilled my expectations. If you read my initial installment in this series, you will have a good idea of my biases and that should help you evaluate my comments.
The six workshops I have attended, in chronological order are: Digital Landscape Workshop Series in the Coastal Redwoods of California, conducted by Moose Peterson, Laurie Excell, Joe McNally and Vincent Versace; Amazon Photographic Expedition Workshop in the Brazilian Amazon, conducted by Michael Reichmann, Jay Maisel, and Andrew Rodney; Barefoot Contessa Photo Adventures in New England, conducted by Margo Pinkerton and Arnie Zann; Digital Photography Workshops in Death Valley, conducted by Stephen Johnson; Santa Fe Workshops in Santa Fe, New Mexico, conducted by Jay Maisel; and Barefoot Contessa Photo Adventures in Moab, New Mexico, also conducted by Margo Pinkerton and Arnie Zann. This year, I am planning on attending my third Barefoot Contessa Photo Adventure in Canyon de Chelly and Navajoland.
Digital Landscape Workshop Series: Coastal RedwoodsMarch 2006
I had no expectations when I attended this workshop. I just wanted to spend some time with some professional photographers and other amateurs to see where I fit in. When it was all over, I found that I had learned quite a bit and had a better sense of what it means to be a professional. I also met a lot of wonderful people. Joe McNally was very approachable and amazing in his skills as a lighting expert. I cannot recommend highly enough attending one of his lighting workshops. Vincent Versace is another wonder. His ability to use Photoshop in creative ways was awe-inspiring. He and Joe also are able to tell great war stories. The biggest drawback was the large number of other participants. At times, I felt like our group outnumbered the redwoods. It was a good first experience because I had nothing with which to compare it. Now, after attending five other workshops, I would have to say that I would not attend another DLWS workshop because of the number of participants (approximately 27) that were allowed. Also, there was nothing particularly special about the workshop, other than the chance to meet Joe McNally, Vincent Versace and Moose Peterson.
Amazon Photographic Expedition Workshop 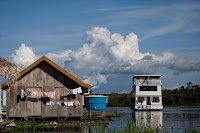
April 2007
This workshop consisted of ten days aboard a three-deck houseboat on the Amazon and Rio Negro Rivers, and their tributaries, all in the vicinity of Manaus, Brazil. There were also visits to some communities along the river, as well as time spent in the shops and markets of Manaus. There were fourteen attendees in addition to staff, staff spouses, and boat crew. Many of the attendees were spouses of photographer attendees who were more interested in the naturalist aspects of the trip and spent most of their time with the naturalist on the trip, Fiona Reid, a very delightful and extremely knowledgeable person. My wife was one of those spouse attendees and she had a wonderful time hanging around with Fiona and helping to collect live bat specimens, sloths, and insects. Since we would go out each morning in canoes to our shooting locations, the non-photographers would gather in a separate canoe with Fiona to investigate the wildlife. They came to be known as the "old buggers" and they named us the "paparazzi."
This was by far the most exotic workshop I have attended. For that reason alone, it remains very special. The greatest benefit that Michael Reichmann provided to the attendees was organizing the trip and inviting Andrew Rodney and Jay Maisel to join him. To be able to spend ten days in a houseboat and canoes with Jay Maisel and Andrew Rodney by your side is to be in photography heaven. They both give generously of their time and inestimable knowledge. Even now, almost three years later, I am still in touch with Andrew (and will be providing him with a free meal after attending his lecture in the Epson Print Academy in San Francisco later this month) and with Jay (who will also be receiving a free meal after he gives me, my wife, and two of our very special friends, Les and Emy Phillips, a tour of his converted bank building in The Bowery in March). All of the attendees were great to be around, especially nice when you are all sequestered on a houseboat. Would I take another workshop from Michael Reichmann? Only if it was to some exotic place. The instruction received from Andrew on color management was exceptional, as is his book "
Color Management for Photographers: Hands on Techniques for Photoshop Users". He was also kind enough to provide each of us with a copy of Pixel Genius' Photokit Sharpener Pro which I have integrated into my workflow. Jay presented a mini-version of the seminar I attended in Santa Fe. In addition, he was constantly providing anecdotes based upon his years of experience that gave me real insight into the life of a highly-respected professional photographer. You should be forewarned that Michael did not provide any field assistance at all. I cannot say whether that would be true in other venues. I can only speak for my personal experience. While I would not attend a workshop organized by Michael, except to an exotic location, I must give him credit for producing excellent training tools with Jeff Schewe, particularly the "
From Camera to Print" materials. What saved this workshop was the location and the accessibility of Andrew and Jay.
Barefoot Contessa Photo Adventures: New England 
September 2007
Barefoot Contessa Photo Adventures: MoabSeptember 2008
I attended the New England workshop in September 2007 and the Moab workshop in September 2008. I will be attending a third Barefoot Contessa Photo Adventure Workshop in July 2009 at Canyon de Chelly and Navajoland. If you can only attend one photography workshop, then do yourself the favor and have it be one of the Barefoot Contessa Photo Adventures. I grew more as a photographer after spending four days with Margo and Arnie than at any other time. They limit their workshops to no more than six persons per instructor and they take their role seriously. More than any of the other workshop providers (with Stephen Johnson a very close second), they are there primarily to serve the attendees. Whereas Michael Reichmann always appeared more interested in capturing his own images than in helping one of the amateurs, Margo and Arnie seek the participants out and ask them about what they are trying to achieve and then make suggestions about possible other approaches to the subject matter. They are supportive at the same time as they push you to think more creatively and get it right in the camera. Whatever skills I may have, they are significantly stronger as a result of the time I have spent with these two people. Not only are they excellent photographers, but they are also warm and generous. They have both become very good friends of mine and yet we have spent less than two weeks together. It is a testament to their genuine commitment to their students that I keep coming back for more.
Digital Photography Workshops 
January 2008
Before I ever attended one of Steve's workshops, I travelled to his studio and gallery in Pacifica, California, to have some of my photography portfolio critiqued by him. What I discovered is that Steve has an impeccable eye for composition, color correctness and tonality. I have since discovered the depth of his Photoshop knowledge. Beyond that, his images are beautiful to behold. Based upon all of that, I decided to attend one of his workshops. I found Steve to be very approachable in the field and a wonderful source of information about photography as an art form. If you get a chance, please consider reading his book entitled "
Stephen Johnson on Digital Photography". I thoroughly enjoyed the workshop because of Steve's knowledge of Death Valley's treasures and his insight into the photographic process. The formal instruction portion in the classroom was a bit light, but the field work more than made up for that. I would certainly consider attending future field workshops, but personally I think I would get the most out of his more technical workshops that are conducted at his studio, such as his four-day class on fine art digital printing.
Santa Fe Photographic Workshops: Light, Gesture, Color, and Perception
by Jay MaiselFebruary 2008
First of all, this is really not a field workshop. Each day, we would receive instruction from Jay on the subject matter components, i.e., light, gesture, color and perception, and would spend the rest of the day going out on our own to capture images. Jay does not accompany the students into the field. He also cajoles you to take pictures of people, one of my weak points. If you are looking for a field workshop experience, then this is not the workshop for you. If instead, you are looking for a chance to be steeped in years and years of photographic experimenting and refinement of technique and vision with a master photographer, attend one of Jay's seminars. I did not capture more than a handful of images during the week that I would want to share with others, but I did gain significant insight into what goes into a "successful" image. I keep hoping that Jay will write a book like Joe McNally wrote, containing all of the tidbits that Jay has collected. He has already forgotten more than I have ever learned about the art of photography, and Jay has a very good memory. He would like to have you think that he is a cantankerous old coot, but that couldn't be further from the truth. If you approach him with a sincere desire to learn, he will take the time to teach, but he also will not suffer the fool. I will never forget his comments to me on the houseboat in the Amazon. After looking at several of my images and making positive comments on the composition and play of light, he leaned over very close to my ear and said "But don't give up your day job." It is that kind of honesty and directness that makes him such a special person. I only wish I had met him thirty years ago. If you are independently wealthy, consider taking his seminar at his Bowery studio for $5,000 and spend five days with Jay in his element, or spend $1,325 to attend his seminar in Santa Fe. That's what I did.
In summary, I would strongly recommend the Barefoot Contessa Photo Adventures if you are looking for a true field workshop experience that can't help but make you a better photographer. If you are looking for a strong blend of technical knowledge and a foundation for a better understanding of the art of photography, then Stephen Johnson would be your choice. If you don't need field instruction, but instead simply want to soak up inspiration from someone who has seen it all and knows how to communicate what he has seen, then by all means seek out Jay Maisel. You will be glad you did. What I have learned is that one size does not fit all, but there is much to be gained by taking the best from each of these fine photographers.
Next Week: Soft Proofing


