Wednesday, January 2, 2013

Death Valley Revisited and What are Color Spaces?

DEATH VALLEY

At the beginning of December, I had the pleasure of presenting a workshop on Lightroom 4 in conjunction with the Barefoot Contessa Photo Adventures field workshop run by Margo Pinkerton and Arnie Zann, two highly accomplished photographers and wonderful teachers.  This was my second effort for Margo and Arnie, the first occurring in Taos, New Mexico earlier last year.  In 2013, I will be presenting the Lightroom workshop again prior to the Colorado workshop in September, and then I will stay for the field workshop as a Lightroom resource person.  I will also attend the Summertime on the Maine Coast workshop as a Lightroom resource person beginning July 28.  Because of logistics (i.e., a lack of adequate meeting facilities), I won't be able to provide the Lightroom workshop before the Maine field workshop.

If you have never gone on a photography workshop, seriously consider attending a Barefoot Contessa Photo Adventures field workshop.  I attended my first BCPA workshop in 2007 (New England).  Since then, I have attended BCPA workshops in Moab, Utah, Yosemite Valley, California, Belize, and Costa Rica.  In February, my wife, Kathy, and I will attend another BCPA workshop in Cuba.  I have never been disappointed and I have met so many wonderful fellow photographers.  I have also improved my own photography as a result of the interaction with Margo and Arnie.  They always put the attendees ahead of their own photo activities.

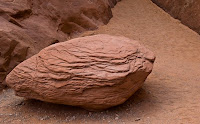
The recent trip to Death Valley was my third venture to that strange and beautiful location.  I thought Death Valley was nothing but desolation and lots of sand.  Both of these beliefs are wrong.  There is great diversity and very little sand.  Every time I visit, I return to Zabriskie Point and to Badwater.  They are iconic locations  that provide a great deal of variety depending on the time of day and the season.  Perhaps my favorite part of Death Valley is Titus Canyon.  It is a significant time commitment because of the length of the canyon and the need to travel out of Death Valley to enter the canyon.  Travel is in only one direction, so once you begin you are committed to continue to the end.  It is well worth it.  I wasn't able to do the canyon this time around.  I have never made it to Eureka Dunes or to the racetrack, partly because of the distance from Stovepipe Wells and the poor road conditions.  Maybe next time.

So here is a sampling of my efforts during the five days I travelled around Death Valley with Arnie and Margo.  For me, it was my most successful trip there yet, and not likely to be my last.


COLOR SPACES

For the last three years, I have taught a workshop at the Viewpoint Photographic Art Center in Sacramento, California, entitled "Digital Fine Art Printing" that attempts to demystify the entire digital printing process.  One of the great attractions of creating digital images is the ability to control all aspects of the creative journey, from capture, through post-processing, and finally to the final exhibition print.  It is easy to get bogged down in calibration, rendering intents, color spaces, black point compensation, sharpening for output media, and icc profiles.  I thought I would take this opportunity to help people better understand the importance of color spaces.

For photographers, we are able to concentrate on three absolute color spaces, sRGB, Adobe RGB (1998) and ProPhoto RGB.  First, we need to understand what is meant by a color space, and also the meaning of gamut.  We are used to seeing color as being represented by three numbers, each ranging from 0 to 255, which is 256 values, or 2 to the 8th power (corresponding with 8-bit depth).  Red would have a value of 255, 0, 0.  Green would be 0, 255, 0, and blue would be 0, 0, 255.  This numbering system is known as a color "model".  To be useful in communicating color information among devices, it is necessary to assign the color model to an absolute color space.  Here is a diagram that shows three color spaces: CIE xy, sRGB and Adobe RGB (1998).  The entire set of colors shown is the CIE xy color space, which is the range of colors that the human eye can see.  The two triangles represent sRGB (smaller triangle) and Adobe RGB (larger triangle).  The highest tip of each of the two triangles represents green and would have the values of 0, 255, 0 in both color spaces, but as you can see would have very different appearances of green.  That is why the color space is so important in being able to communicate among devices.


The area encompassed by the triangles is called the "gamut" for that color space.  As you can see, the gamut for sRGB is significantly smaller than Adobe RGB.  Web pages use the sRGB color space whereas printers use either the Adobe RGB or ProPhoto RGB color spaces.  Here is another diagram that shows the ProPhoto RGB color space in relation to the CIE xy color space and the Adobe RGB color space.


As you can see, the ProPhoto RGB color space is significantly larger than the Adobe RGB color space and also includes colors within its gamut that cannot be seen with the human eye.  I don't have time or space to fully discuss the relative pros and cons of Adobe RGB and ProPhoto RGB, so I need to direct you to another site for that discussion.  Uwe Steinmueller posted an essay on the Digital Outback Photo website that explains why the ProPhoto RGB color space is preferable to Adobe RGB.  Be aware that this conclusion is only supported if you use 16 bit images, rather than 8 bit images (like jpegs).  Here is a link to the essay.  The simplest statement that can be made is that your images will have less potential "banding" if the original image colors fall within the gamut of the chosen color space.  If they don't, then rendering intent comes into play, which is an entirely different discussion, perhaps to be covered in my next blog.  As a result, larger color spaces tend to create the fewest issues regarding properly reflecting the original colors of the scene in the final print.

Well, enough for this installment.  Next time, I want to share images I captured over twenty-one visits to the Gladding McBean terra cotta factory, starting in 2006 and ending in 2011 when the working factory was closed to photographers.  I have narrowed the collection down to slightly less than twenty B&W images out of a final cut of approximately ninety images.  It wasn't easy.

Thursday, December 13, 2012

What's New?

It has been over two years since I last posted on my blog.  I have wanted to be more consistent in posting, but the press of business and other projects has made that difficult.  However, I ran into a fellow photographer at a recent artists' reception for an exhibit in which both of us are included and she mentioned how much she had enjoyed my blog.  That was enough motivation to get back into the practice of posting a combination of information of interest to photographers and to talk about the various "shoots" that I attend with friends, fellow photographers or as an attendee at a field workshop. 

For the last three years, I have been teaching a variety of subjects related primarily to the technical side of photography.  Most of the workshops have been presented at Viewpoint Photographic Art Center in Sacramento, California.  The topics have included Lightroom, Digital Fine Art Printing, B&W Conversion of Digital Images, Noise Reduction & Sharpening Techniques, and Post-Processing of Digital Images.  More recently, I have begun teaching Lightroom in conjunction with the Barefoot Contessa Photo Adventures.  This year, I presented in Taos, NM, and in Death Valley, CA.  I will be presenting again next year at two locations for BCPA, so stay tuned for information as to where and when.  I have attended five field workshop with BCPA so far, and my wife, Kathy, and I are scheduled to attend a sixth workshop that will be traveling to Cuba.  This year, Kathy and I went to Costa Rica on a BCPA workshop.  It was fantastic!  If you have ever thought about going on a field workshop, I guarantee that you will have the time of your life on a BCPA workshop.  Margo Pinkerton and Arnie Zann are excellent photographers, but just as important, they know how to bring the best out of the attendees, while having great fun.

I recently received word that I had images accepted into both the Santa Fe Photographic Workshops "Outside" Contest and the Center for Photographic Art annual juried exhibition.  Each accepts approximately fifty images for exhibit out of thousands of submissions from around the world.  I have been fortunate to be included previously in the Santa Fe Photographic Workshops "Light" Contest and in last year's annual juried exhibition at the Center for Photographic Art.  The one exhibit that has escaped me so far is the Art of Photography in San Diego, but I will persevere.

Well, that's enough to get the ball rolling again.  Next post I will share some images from Death Valley and try to demystify color spaces.

Thursday, August 26, 2010

What's New?

When I posted in April, I had every intention of posting monthly.  Unfortunately, time got away from me again.  Over the last five months, I have presented five workshops at the Viewpoint Photographic Art Center and have another one scheduled for the beginning of November.  The workshops have focused on Adobe Photoshop Lightroom for the most part, although I also presented a workshop on Digital Fine Art Printing and another on Black and White Conversion of Digital Images.  This was the second time I have presented the printing workshop.  After explaining color spaces, calibration of monitor, printing presets (like black point compensation and rendering intent) and other technical aspects of fine art printing, I accept images from the participants and run them through the process to show improvements that can be made.  This process helps the participants understand tools that are available to take their prints to the next level.


In the course of preparing for the B&W conversion workshop, I came across an action created by Greg Gorman and Mac Holbert that was particularly effective in making the conversion.  You can download a pdf file that sets forth the action here.  Here is an example of an image created with this action.


I have begun to create more black and white images over the last eight months or so in an effort to refocus my attention on the quality of light in an image and on composition.  It is easy to become lazy with color images and have the color carry the day.  I have become enamored with Nik Software's Silver Efex Pro.  With its combination of presets and the ability to use its "control point" technology, it is possible to fine tune any image.  The software even allows you to apply grain characteristics of different film types to the image.  I highly recommend it for anyone seriously interested in creating the very finest B&W images.  Here are some images created with Silver Efex Pro:


While there are endless variations on methods for making the B&W conversion, I narrowed it down to the following techniques for my workshop (contact me if you want any details about any of these methods):


Lightroom


  • Desaturation
  • Grayscale
Photoshop
  • Desaturation
  • Grayscale
  • Gradient Map
  • Separate Channel Layers
  • Channel Mixer
  • Black & White Adjustment Layer
  • L*a*b Conversion
  • Twin Hue/Saturation Method
  • Grayscale/Color Channels Method
  • Greg Gorman/Mac Holbert Action
Third Party Plug-In
I have not had much time to concentrate on my own photographic skills, other than in preparation for the workshops.  However, I did participate in Scott Kelby's Third Annual Worldwide Photo Walk on July 24 by joining fellow photographers in the Mission District of San Francisco.  I have been back to San Francisco twice since then, most recently this last Friday to put my youngest daughter on a plane to Barcelona, Spain so she could attend the University of Barcelona for her entire junior year of college.  She is already fully acclimated in less than a week.  Here is a sample of the images I captured on these recent trips.  


 As you can see, I am trying to listen to Jay Maisel and start concentrating on people.  It doesn't come easy for me, but it is rewarding when a particular image conveys an emotion.

Well, I am probably done with juried competitions for 2010.  I entered ten competitions and was accepted into eight.  The Art of Photography Show in San Diego eluded me again this year, so I will try next year.  I already have an exhibit set for next year.  This will be my first exhibit outside California.  Chris Schiller and I will be presenting a joint exhibit at the Grants Pass Museum of Art in Oregon.  They approached me about exhibiting, which was a first.  Usually, it is necessary to put together a proposal and then send it to several venues in hopes of garnering some interest.  For galleries that are not limited to photography, there are often no more than two opportunities per year to exhibit.  The competition is fierce for those openings.  If you are in the Grants Pass area of Oregon during October or November of 2011, please stop in and see my work and that of Chris Schiller.  He is an exceptionally talented photographer.

Next up are trips to Avila Beach for a family vacation at the beginning of September and the workshop in Yosemite Valley in December, both of which should generate new images.  In the meantime, I will be updating my website with new images, so go take a look next week.  Happy shooting!

Next Post:  Avila Beach


Monday, April 12, 2010

I'm Back!

After a very long hiatus, during which I concentrated on all things photographic (except this blog), I have decided to resume the blog, but to move it from a weekly occurrence to a monthly event. That is in keeping with a hectic and unpredictable schedule. Since I last blogged, I have made the switch entirely over to Nikon. I am the proud owner of the Nikon D3 and even prouder owner of the D3s. With its high ISO/low noise capability, I can now shoot handheld in situations that previously demanded a tripod. Recently, I captured images inside the Black Chasm Cavern near Volcano, California. Here is an image, unretouched, that was captured at an ISO of 12,800.


Beyond the equipment changes, I have been traveling a bit, starting with a trip to Cambria, California, to attend the annual Cambria Art and Wine Festival. It's a beautiful little community and the wine is very nice. If you visit, make sure you stop by the Lions Peak Wine Company in Cambria and try the Verignon wine with the stilton cheese and mango.

Last March, I had the privilege of visiting Jay Maisel in his Bowery building that serves as a gallery, workshop, storage facility and home. He was gracious as always and took my wife, Kathy, and I, as well as our good friends, Les and Emy Phillips, on a guided tour of this five-story converted bank building. I reciprocated by taking him and his delightful wife to dinner at one of his favorite restaurants. We also managed to take in "Wicked" on Broadway. New York City has to be one of my favorite places. It is vibrant, exciting, and full of surprises.

Next stop was Idaho for my brother's wedding. At his request, I acted as the official wedding photographer. This was my fifth wedding as a photographer and something that I now do only for close friends. Most brides and grooms seem to want the same set of stock group shots and for a photographer used to shooting what he finds interesting, it can be a stifling experience.

During May, I participated in a three-person exhibit of photographs entitled "Sense of Place" at the Viewpoint Photographic Art Center in Sacramento, California. My contribution was of images captured during my trip to the Brazilian Amazon during April 2007. The other two photographers provided images of Venice and of Antarctica.

By the way, I am still waiting for the video promised by Michael Reichmann as part of the workshop. Each year around March, I send another e-mail to him, asking when we will receive the video, and each year, including this year, he says it will be soon. According to his most recent communication, it just hasn't risen to the top of his list of priorities, and he is surprised that it is an issue to me. He's probably right. It has only been three years since the workshop occurred. Of course, attending another of his workshops has not risen to the top of my priorities either, and likely never will, especially with so many other excellent providers out there from whom to choose.

July took me to Bandon Dunes in Oregon for golf and very little photography. Another beautiful area that I need to revisit when I can focus on photography, rather than a small white ball that has a mind of its own.

September brought a trip to Avila Beach with the family for our annual Labor Day weekend. I was able to both enjoy the scenery and capture it on this visit.

In October, I returned to Washington, D.C., where I attended law school over thirty years earlier, and also where I lived for six years in nearby Gaithersburg, Maryland. As much had stayed the same as had changed. It felt comfortable after only a couple of days, walking the streets and riding Metro.

I used 2009 as a year to work on my photography skills and become proficient in Lightroom. Toward that end, I presented numerous workshops on the various modules within Lightroom, as well as a workshop on digital fine art printing. These workshops are being presented by me again this year during April, May and June at the Viewpoint Photographic Art Center, and my goal is to become an Adobe Certified Expert in Lightroom this year.

I just finished framing thirteen prints for a joint exhibit with a very fine photographer, Chris Schiller, wherein we are pairing images based upon their graphic similarities, mine in color and his in black and white. This exhibit opens on April 17 at the Blue Line Gallery in Roseville, California, and continues for two months. It is entitled "Brilliant Earth" and is in conjunction with Earth Day celebrations. Two sculptors and a videographer are also part of the exhibit. I will also be exhibiting in the 2010 Kellicut International Juried Photo Show at the Coastal Arts League's gallery in Half Moon Bay this June. Unlike 2009, I have been accepted into five juried shows so far in 2010 and have high hopes that this will be the year that I am accepted into the Art of Photography Show at the Lyceum in San Diego, California.

I recently returned from my third Barefoot Contessa Photo Adventures workshop, this one in Belize. In December, I will attend my fourth workshop with the Barefoot Contessa, Margo Pinkerton and her husband, Arnie Zann, in Yosemite National Park. They continue to maintain their high standards and commitment to participants. This month, I am also returning to take an intermediate fine art printing workshop from Stephen Johnson at his Pacifica studio, by far the finest printmaker I have ever met, as well as an amazing photographer and teacher of Photoshop techniques. He also happens to be an extremely warm and giving person. I have been very lucky to meet people like Steve, Margo, Arnie and Jay, as a result of my passion for photography.

Now that we are caught up, future blogs will concentrate on technical issues, current debates in the photography field, workshops, and recent photography trips. I hope you will come back each month and see what's new.

Next Post: What's New?

Wednesday, January 21, 2009

Gladding, McBean Terra Cotta Clay Factory-A Photographer's Dream


I first became involved with the Viewpoint Photographic Art Center in December 2005. At that time, Viewpoint was located in an industrial area of Sacramento, well off the beaten track. Now Viewpoint has a home in the midtown section of Sacrmento, right in the heart of the arts district. Upon discovering Viewpoint and its commitment solely to photography, I also became aware of the fact that it sponsored workshops at an operating terra cotta clay factory in Lincoln, California. I signed up for my first workshop in March 2006 and have returned twelve times since then. In March, I will spend another two days discovering more of the hidden treasures within the confines of this facility as one of the instructors. It is thanks to Gene Kennedy, a well-known photographer, and the management of Gladding, McBean that photographers have been given a unique opportunity to capture images within this working factory.


Gladding, McBean has been around since 1875 at its current location, all because of the clay discovered at the site. At first, the factory turned out clay sewer pipes. It still manufactures clay sewer pipes. About ten years after opening, it began to also create terra cotta trim for buildings, first in San Francisco, then to other areas of the United States and finally the world. The factory extended its product line to roof tiles, ornamental pottery, and fire bricks by the end of the nineteenth century. Examples of all of these products can now be found throughout the buildings comprising the factory.


As a photographer, I am drawn to Gladding, McBean by the sense of history, as well as all of the old buildings, kilns, product and furnishings. Because this is an operating factory, the mix of product and the location of open and used areas is constantly changing. The one thing that doesn't change is one of the rooms on the third floor of one of the buildings that was occupied by the master modeler. When he died in the 1950's, his room was left as it was. To this day, there are many items in the cubby holes and on the walls that were first placed there over fifty years ago.


I also tend to be drawn to graphic elements in nature and in architecture. Gladding, McBean is rich with such subjects. The patina of clay dust adds wonderful character to the images, as well as wreaking havoc on digital camera sensors. That's one of the reasons I always carry two camera bodies during trips there, one with a 16-35 mm or 24-70 mm lens, and the other with a 60 mm or 100 mm macro lens. Cleaning dirty sensors is no fun, nor am I interested in losing valuable time cleaning instead of capturing. The sessions run from 8:30 in the morning until around 4:30 in the afternoon, and that is hardly sufficient time. Every visit to the factory leads to new discoveries. I had never visited the building housing the clay hoppers until my twelfth time coming to the site, and I have every reason to believe that the next trip will open up yet another room or section of a room as yet unexamined.
I assembled seventeen of my images from trips to Gladding, McBean for a solo exhibit at the Pence Gallery in Davis, California, in January 2008. Those images can be viewed here. For more recent work, please visit this site.


If you are interested in attending one of the workshops, then visit Viewpoint's Workshop site for dates and cost. It is a unique experience that is well worth the time and money.


Next week: Exploring Your Own Back Yard

Monday, January 12, 2009

Soft Proofing


Anyone who has printed on matte photo papers has probably experienced disappointment in the quality of the print compared to the image appearing on the monitor. It is made worse when the monitor itself has not been properly calibrated. Calibrating your monitor is critical to any sensible printing workflow. Otherwise, you will end up making multiple prints in order to achieve the intended result, i.e., a print that matches the characteristics of the monitor image.


The purpose of soft proofing is to convert the monitor image into an image that most closely matches the print image by taking into account the specific characteristics of the paper being used for the print. This installment of my blog sets forth a step-by-step process for achieving this result. I believe the following steps work regardless of operating system platform or make of printer, but just in case be aware that I use Windows XP and either an Epson 3800 or Epson 7880 printer in creating my printed images. Also be aware that this explanation is based upon using Adobe Photoshop CS3. While I believe it also works on previous versions of Photoshop, beginning with Photoshop 6, I want you to know that these steps are based upon that version of Photoshop and may require modifications to work in earlier versions or in CS4.


Step One: Make all adjustments that you intend to make to your image in Photoshop, including any output sharpening for the print media you intend to use.


Step Two: With no other images open except the one you intend to print, select Image>Duplicate Image. When the duplicate image comes up, select Window>Arrange>Tile Horizontally (or Tile Vertically, depending on orientation of image). Then make sure that you have selected the original image rather than the copy for performing the following steps. You will know if you have if the bar at the top of the image is highlighted rather than dimmed.


Step Three: Next, select View > Proof Setup > Custom. The Customize Proof Condition dialog will be displayed, allowing you to select the options for how the proof should be created. First, select the profile for the paper you’ll be using from the Device to Simulate drop-down box. If you have previously loaded the paper profiles into your version of Photoshop, they will all show up. Do not check the box for Preserve RGB Numbers. Next, select the Rendering Intent from the drop-down box. Normally, it will be Perceptual, but you should check with the paper manufacturer to first determine what is recommended. You are free to select one of the other rendering intents if you believe it provides more pleasing color. Just make sure you also change it in the print settings when you actually go to print the image. There are three remaining boxes in this dialogue box. They are Black Point Compensation, Simulate Paper Color and Simulate Black Ink. I recommend checking the Black Point Compensation box and the Simulate Paper Color (which automatically checks the Simulate Black Ink box). If you are using a matte paper stock, you will notice an immediate “dulling” of the original image. This is because the image is now simulating what the final printed image will look like. Click the Save button and assign a name to this proof condition that you have just created. I recommend a name that identifies the printer, the paper stock and the rendering intent, e.g., Epson 3800 Hahnemuhle Museum Etching Perceptual. That will make it easy to identify when you later want to soft proof another image with that same paper and rendering intent on that printer. Next time you use this soft proof combination, you can go straight to View>Proof Setup>Epson 3800 Hahnemuhle Museum Etching Perceptual because it will now be on the list of available soft proof setups.


Step Four: Now you need to make adjustments to your original image as necessary to have it match the look of the copy that should be right next to it on the screen. Generally, two adjustments at most are necessary to achieve this. First, select Layer>New Adjustment Layer>Curves, change the Mode to Luminosity, since you only want to affect the luminance and not the color of the image at this stage. When that dialogue opens, place a point at the very center of the starting curve so as to anchor the mid point of the curve. Then pull down on the curve near its lower end, but within the area of the histogram shown in the background of the curve area. Finally pull up the curve near its upper end, also within the area of the histogram. Basically, you are creating a traditional “S” curve that increases contrast. You will need to experiment to get the adjustment just right, including possibly moving the middle anchor point up or down, but you should be aided by having the copy of the image next to the original so that you see in real time what your changes to the curve layer are doing to the original. If, after completing this, the colors appear somewhat flat, select Layer>New Adjustment Layer>Hue/Saturation and leave in the Normal Edit Mode since you do intend to affect color at this stage. In this dialogue box, select OK and then pull the Saturation slider to the right until the colors match. Do this in the Master Edit setting, rather than in individual color channels. With these two adjustments, you should be able to match the original image to the copy.


Step Five: Close the copy of the image without saving it.


Step Six: Select View>Proof Setup>Working CMYK. This is the default setting when you are done with soft proofing. You will notice that your original image is now much darker than before and may even appear unappealing. That is to be expected. Go ahead and print it without making any other adjustments. After you have printed the image, remove the two layers that you created to achieve the soft proofing or else give them names that identify them as soft proofing layers so that you don’t forget to remove them before you decide to print the image in the future on a different paper or with a different profile or a different printer.


That’s all there is to soft proofing. You should notice a significant improvement in the images that you print on matte papers and very little to no improvement when printing on glossy papers, primarily because the ink absorption in glossy papers is so much less than in matte papers.


Happy printing!

Next week: Gladding, McBean Terra Cotta Clay Factory-A Photographer's Dream

Tuesday, January 6, 2009

My Personal Experiences with Photography Workshops

Since March 2006, I have attended six formal photography workshops. In addition, I have attended numberous single-day workshops and portfolio reviews. This week, I will tell you what I look for in a photography workshop and the extent to which each of my experiences fulfilled my expectations. If you read my initial installment in this series, you will have a good idea of my biases and that should help you evaluate my comments.

The six workshops I have attended, in chronological order are: Digital Landscape Workshop Series in the Coastal Redwoods of California, conducted by Moose Peterson, Laurie Excell, Joe McNally and Vincent Versace; Amazon Photographic Expedition Workshop in the Brazilian Amazon, conducted by Michael Reichmann, Jay Maisel, and Andrew Rodney; Barefoot Contessa Photo Adventures in New England, conducted by Margo Pinkerton and Arnie Zann; Digital Photography Workshops in Death Valley, conducted by Stephen Johnson; Santa Fe Workshops in Santa Fe, New Mexico, conducted by Jay Maisel; and Barefoot Contessa Photo Adventures in Moab, New Mexico, also conducted by Margo Pinkerton and Arnie Zann. This year, I am planning on attending my third Barefoot Contessa Photo Adventure in Canyon de Chelly and Navajoland.

Digital Landscape Workshop Series: Coastal Redwoods
March 2006

I had no expectations when I attended this workshop. I just wanted to spend some time with some professional photographers and other amateurs to see where I fit in. When it was all over, I found that I had learned quite a bit and had a better sense of what it means to be a professional. I also met a lot of wonderful people. Joe McNally was very approachable and amazing in his skills as a lighting expert. I cannot recommend highly enough attending one of his lighting workshops. Vincent Versace is another wonder. His ability to use Photoshop in creative ways was awe-inspiring. He and Joe also are able to tell great war stories. The biggest drawback was the large number of other participants. At times, I felt like our group outnumbered the redwoods. It was a good first experience because I had nothing with which to compare it. Now, after attending five other workshops, I would have to say that I would not attend another DLWS workshop because of the number of participants (approximately 27) that were allowed. Also, there was nothing particularly special about the workshop, other than the chance to meet Joe McNally, Vincent Versace and Moose Peterson.

Amazon Photographic Expedition Workshop
April 2007

This workshop consisted of ten days aboard a three-deck houseboat on the Amazon and Rio Negro Rivers, and their tributaries, all in the vicinity of Manaus, Brazil. There were also visits to some communities along the river, as well as time spent in the shops and markets of Manaus. There were fourteen attendees in addition to staff, staff spouses, and boat crew. Many of the attendees were spouses of photographer attendees who were more interested in the naturalist aspects of the trip and spent most of their time with the naturalist on the trip, Fiona Reid, a very delightful and extremely knowledgeable person. My wife was one of those spouse attendees and she had a wonderful time hanging around with Fiona and helping to collect live bat specimens, sloths, and insects. Since we would go out each morning in canoes to our shooting locations, the non-photographers would gather in a separate canoe with Fiona to investigate the wildlife. They came to be known as the "old buggers" and they named us the "paparazzi."

This was by far the most exotic workshop I have attended. For that reason alone, it remains very special. The greatest benefit that Michael Reichmann provided to the attendees was organizing the trip and inviting Andrew Rodney and Jay Maisel to join him. To be able to spend ten days in a houseboat and canoes with Jay Maisel and Andrew Rodney by your side is to be in photography heaven. They both give generously of their time and inestimable knowledge. Even now, almost three years later, I am still in touch with Andrew (and will be providing him with a free meal after attending his lecture in the Epson Print Academy in San Francisco later this month) and with Jay (who will also be receiving a free meal after he gives me, my wife, and two of our very special friends, Les and Emy Phillips, a tour of his converted bank building in The Bowery in March). All of the attendees were great to be around, especially nice when you are all sequestered on a houseboat. Would I take another workshop from Michael Reichmann? Only if it was to some exotic place. The instruction received from Andrew on color management was exceptional, as is his book "Color Management for Photographers: Hands on Techniques for Photoshop Users". He was also kind enough to provide each of us with a copy of Pixel Genius' Photokit Sharpener Pro which I have integrated into my workflow. Jay presented a mini-version of the seminar I attended in Santa Fe. In addition, he was constantly providing anecdotes based upon his years of experience that gave me real insight into the life of a highly-respected professional photographer. You should be forewarned that Michael did not provide any field assistance at all. I cannot say whether that would be true in other venues. I can only speak for my personal experience. While I would not attend a workshop organized by Michael, except to an exotic location, I must give him credit for producing excellent training tools with Jeff Schewe, particularly the "From Camera to Print" materials. What saved this workshop was the location and the accessibility of Andrew and Jay.

Barefoot Contessa Photo Adventures: New England
September 2007
Barefoot Contessa Photo Adventures: Moab
September 2008

I attended the New England workshop in September 2007 and the Moab workshop in September 2008. I will be attending a third Barefoot Contessa Photo Adventure Workshop in July 2009 at Canyon de Chelly and Navajoland. If you can only attend one photography workshop, then do yourself the favor and have it be one of the Barefoot Contessa Photo Adventures. I grew more as a photographer after spending four days with Margo and Arnie than at any other time. They limit their workshops to no more than six persons per instructor and they take their role seriously. More than any of the other workshop providers (with Stephen Johnson a very close second), they are there primarily to serve the attendees. Whereas Michael Reichmann always appeared more interested in capturing his own images than in helping one of the amateurs, Margo and Arnie seek the participants out and ask them about what they are trying to achieve and then make suggestions about possible other approaches to the subject matter. They are supportive at the same time as they push you to think more creatively and get it right in the camera. Whatever skills I may have, they are significantly stronger as a result of the time I have spent with these two people. Not only are they excellent photographers, but they are also warm and generous. They have both become very good friends of mine and yet we have spent less than two weeks together. It is a testament to their genuine commitment to their students that I keep coming back for more.

Digital Photography Workshops
January 2008

Before I ever attended one of Steve's workshops, I travelled to his studio and gallery in Pacifica, California, to have some of my photography portfolio critiqued by him. What I discovered is that Steve has an impeccable eye for composition, color correctness and tonality. I have since discovered the depth of his Photoshop knowledge. Beyond that, his images are beautiful to behold. Based upon all of that, I decided to attend one of his workshops. I found Steve to be very approachable in the field and a wonderful source of information about photography as an art form. If you get a chance, please consider reading his book entitled "Stephen Johnson on Digital Photography". I thoroughly enjoyed the workshop because of Steve's knowledge of Death Valley's treasures and his insight into the photographic process. The formal instruction portion in the classroom was a bit light, but the field work more than made up for that. I would certainly consider attending future field workshops, but personally I think I would get the most out of his more technical workshops that are conducted at his studio, such as his four-day class on fine art digital printing.

Santa Fe Photographic Workshops: Light, Gesture, Color, and Perception
by Jay Maisel

February 2008

First of all, this is really not a field workshop. Each day, we would receive instruction from Jay on the subject matter components, i.e., light, gesture, color and perception, and would spend the rest of the day going out on our own to capture images. Jay does not accompany the students into the field. He also cajoles you to take pictures of people, one of my weak points. If you are looking for a field workshop experience, then this is not the workshop for you. If instead, you are looking for a chance to be steeped in years and years of photographic experimenting and refinement of technique and vision with a master photographer, attend one of Jay's seminars. I did not capture more than a handful of images during the week that I would want to share with others, but I did gain significant insight into what goes into a "successful" image. I keep hoping that Jay will write a book like Joe McNally wrote, containing all of the tidbits that Jay has collected. He has already forgotten more than I have ever learned about the art of photography, and Jay has a very good memory. He would like to have you think that he is a cantankerous old coot, but that couldn't be further from the truth. If you approach him with a sincere desire to learn, he will take the time to teach, but he also will not suffer the fool. I will never forget his comments to me on the houseboat in the Amazon. After looking at several of my images and making positive comments on the composition and play of light, he leaned over very close to my ear and said "But don't give up your day job." It is that kind of honesty and directness that makes him such a special person. I only wish I had met him thirty years ago. If you are independently wealthy, consider taking his seminar at his Bowery studio for $5,000 and spend five days with Jay in his element, or spend $1,325 to attend his seminar in Santa Fe. That's what I did.

In summary, I would strongly recommend the Barefoot Contessa Photo Adventures if you are looking for a true field workshop experience that can't help but make you a better photographer. If you are looking for a strong blend of technical knowledge and a foundation for a better understanding of the art of photography, then Stephen Johnson would be your choice. If you don't need field instruction, but instead simply want to soak up inspiration from someone who has seen it all and knows how to communicate what he has seen, then by all means seek out Jay Maisel. You will be glad you did. What I have learned is that one size does not fit all, but there is much to be gained by taking the best from each of these fine photographers.

Next Week: Soft Proofing